RTQM User's Guide
The User's Guide is up to date as of version 2025.09.004
Document updated: 20250911
Introduction
What is the Real-Time QSO Manager, or RTQM for short? Think of it as a spotting network, except that it's not based on random reports and observations but rather real-time user input. It's a way to call CQ silently if desired, as well as a way to know exactly when stations are standing by and where. Calling CQ can be a frustrating experience. Since any of us can operate on thousands of frequencies and modes, it's just a random shot to call CQ out on the bands. By calling CQ, you're hoping that someone, anyone, will hear you. For that to happen, however, someone must stumble upon your call by happenstance.
That all fades into the past with RTQM. With this new feature, YOU put yourself on the world map indicating your mode and frequency, and then just wait for someone to call! It's not necessary to CQ at all, because you've effectively done that through RTQM
With RTQM, users can see who's available on all bands and all modes simultaneously. Rather than searching the bands endlessly for a weak signal, use RTQM to tune directly to the frequency and start listening
Here's how it works: A QRZ user posts a "I'm here!" message on the RTQM server that indicates his mode, frequency, and location. These messages appear as pins on a world map that are visible to all other users. The "I'm here!" pin on the map lasts only 30 minutes, so you know the information is fresh. Users can refresh their pin if they're still operating on the same frequency. Other operators hearing or working the user also have the ability to indicate such and refresh the pin as well
RTQM Access
Site and Beta Test Related Links
Real Time QSO Map Beta Test Site - This link is for beta test access only. Please do not share
RTQM Beta Test Forum - Issues, discussion and feature requests should be done here in the specific threads
Logging In
The Real Time QSO Manager (RTQM) utilizes the existing QRZ.com authentication system. You will be prompted to log in:
Please use your existing QRZ.com username and password. If you have two factor authentication enabled on your account,
you will be prompted for that code as well.
Once you are properly authenticated, you will be returned to the RTQM Map view.
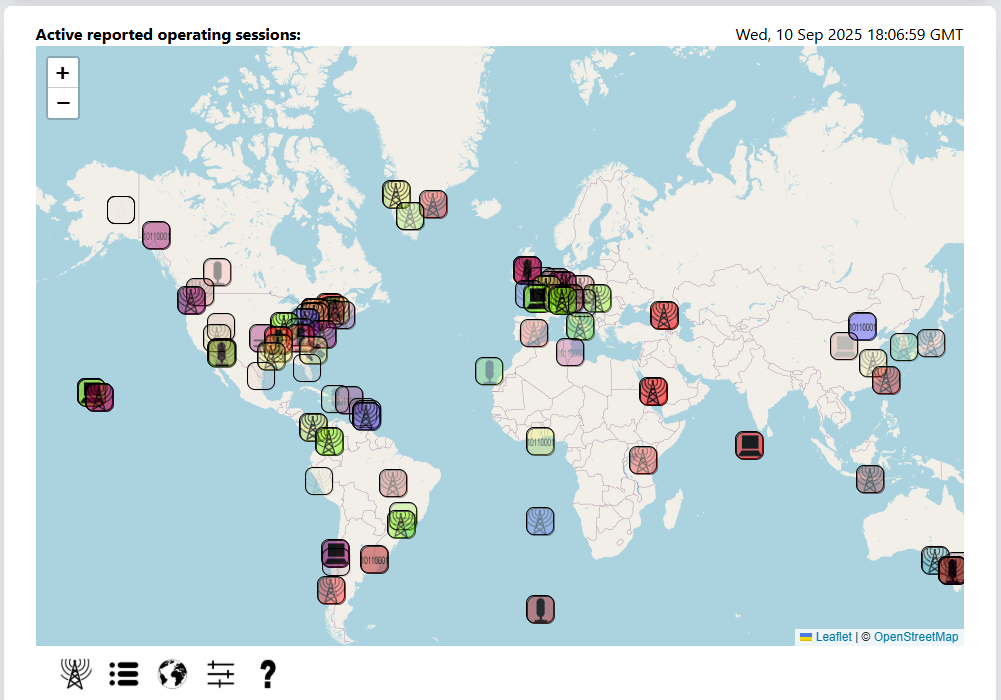
The Map
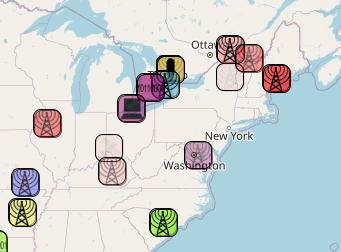
The Real Time QSO Manager introduces the concept of an "operating session". Each operating session has been added by an active user, and RTQM provides a scrollable and zoomable world map showing a marker for each active operating session. An example:
Navigating Around the Map
As the volume of active operating sessions increases, especially in populated geographical areas, the map can become quite crowded as seen in the example above. To alleviate this issue, the map provides the ability to zoom in to specific areas of the map and to pan around the map to see active operating sessions in more concentrated areas.
Zoom
A user may zoom in on geographical areas on the map in one of two ways. First, there are zoom in and zoom out buttons in the upper left corner of the map, identified by (+) and (-) respectively:
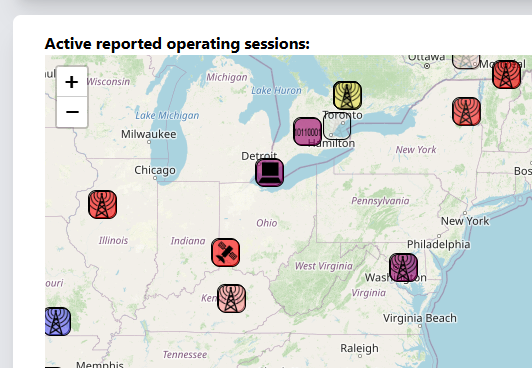
Additionally, users with a pointing device with a scroll wheel will find that they can zoom in and out of the map using the scroll wheel on the pointing device. The map is capable of supporting a zoom range from global down to the neighborhood level to distinguish different active operating sessions:
Scroll/Drag
The map may be moved by clicking on a point and dragging the map to the desired position
Map Markers
Visually diverse markers are provided on both the map and list views of the Real Time QSO Manager in order to easily distinguish between different bands, modes of operation and relative age of the information they indicate.
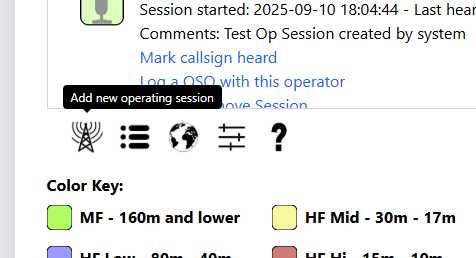
The Color Key
Each operating session has a specified band. For simplicity, the available Amateur Radio bands are divided up into groups and assigned a color as seen in this color key:

The color is then used to set the background color of the op session markers.
Icons
The Real Time QSO Manager assigns an icon to each operating session based on the mode set in the session. These icons are:
Please note that the icons in use and the modes assigned to them is subject to change.
The markers are set to a smaller size on the map view to minimize the amount of overlap that occurs where possible. Hovering the device pointer over an operating session marker causes it to balloon to a larger size to be easier to see.
Opacity and Marker Expiration
The Real Time QSO Manager is designed around the concept of "fresh" data. One of the ways the age of the op session information is conveyed is in the form of the opacity of the op session marker. Each marker is surrounded by a black border so it's obvious where markers are, even as they fade. As the op session information ages and approaches expiration, the op session marker fades until it has expired completely. This behavior is visible in both the map and list views.
Note the varying opacity in this example:
In the map view, hovering over a fading marker enlarges and shows it at full opacity for easier viewing. Once the operating session has expired, the marker is then removed from the map and list views. Details on operating session aging and interaction are covered in the Interacting with an Op Session section below.
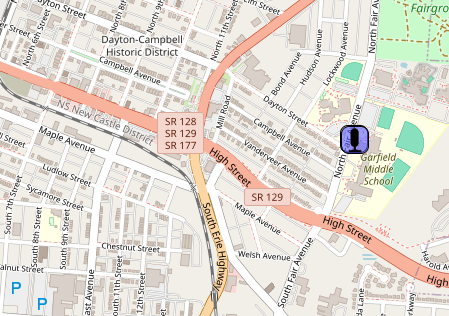
Marker Placement
Each operating session includes the location of the transmitter as specified by the grid provided when the operating session is created. The grid supports 4, 6 and 8 character entries and the associated operating session marker is placed on the map at the center of the specified grid:

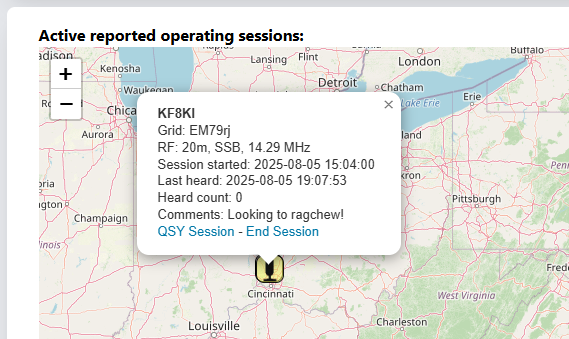
Marker Pop Up
Each marker contains all of the information about the associated operating session. To view it, simply click the marker and a pop up will appear with all of the data:
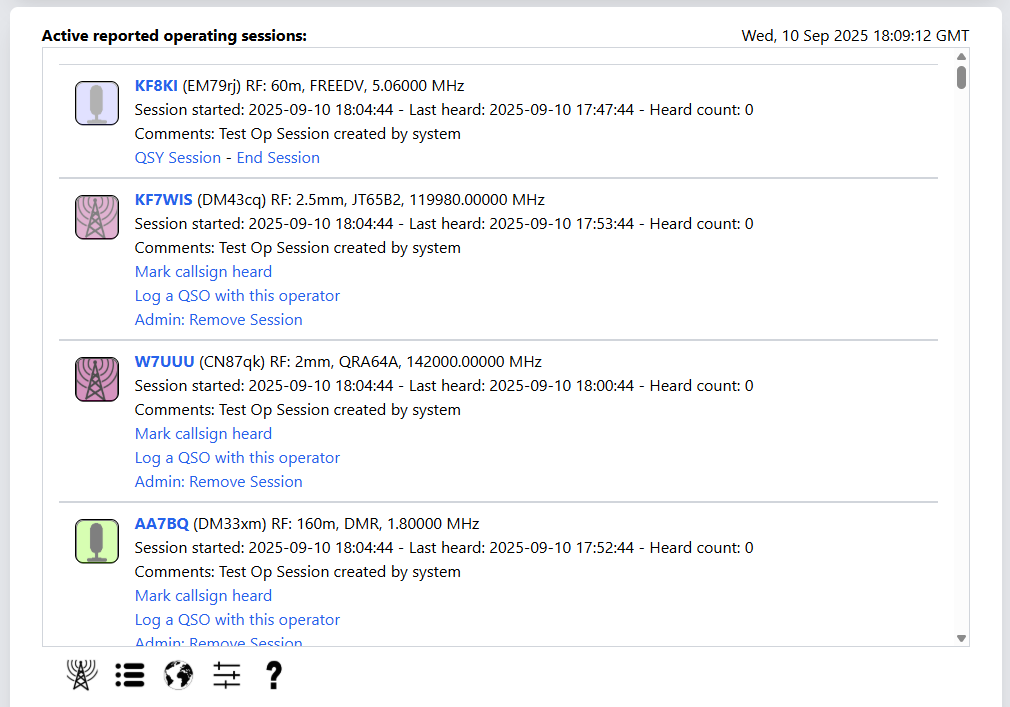
The List View
While the default view for the Real Time QSO Manager is the map view, the user may also select the list view by clicking the list view icon in the tool bar. This provides a more linear display of information where the operating session information is visible for each session.
Currently the list display is sorted by creation date and time of the operating session. Future integration will include sorting and filtering ability.
Differences in Marker Functionality
The list view provides icons for operating sessions just as the map view does, with two exceptions. Details on the specifics of the markers can be found above in the Map Markers section.
In the list view, markers do not enlarge when hovered over. They are already at the larger size since map crowding isn't an issue. Additionally, clicking the markers has no effect, since all operating session information is provided in the list element:

Setting Up an Op Session
The key element in the Real Time QSO manager is the Operating Session, and setting up your operating session is your means to electronically call "CQ". To set up your new operating session, click the New Operating Session button on the toolbar below the map display or list view:
The operating session manager form will open:
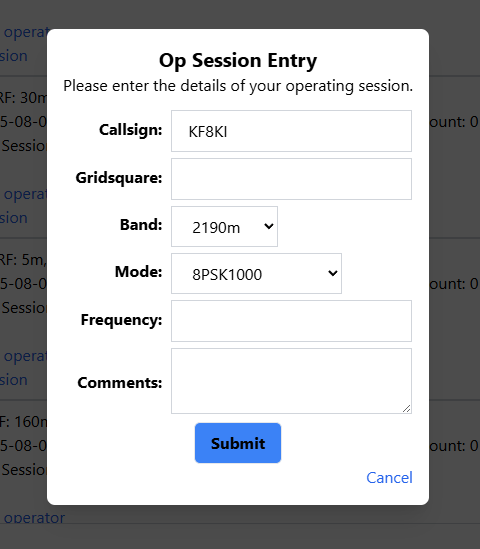
Your primary callsign will be selected as default. Users managing multiple callsigns will have a drop-down available to select which callsign the operating session applies to. Next, please enter all of the relevant data for your session. All fields except comments are required.
- Gridsquare: 4, 6 or 8 characters are supported. Additional characters are ignored
- Band: select from any of the available amateur bands in the world. Be careful. Some bands may not be available in your area or your license level!
- Mode: select from one of the hundreds of modes in the current ADIF specification
- Hint: press the first letter of your desired mode to quickly step through the modes to the one you want
- Future features will include improved mode handling options
- Frequency: enter your intended operating frequency in MHz.
- Comments: add some comments to indicate the nature of or goals for your session. Some examples:
- Looking for DXCC xyz
- Need to confirm Alaska
- Wanting to ragchew!
- New at CW need slow QSOs!
Once you've completed your operating session information entry, click submit, and your session goes live! The system will immediately send out a notification to all connected users and your operating session icon will appear on their map at the grid location you specified!
Interacting with Your Op Session
Once you've created your operating session, you may need or want to make changes to your session. Both the map view and the list view provide links for interacting with the operating session in an appropriate manner. As an owner, your operating sessions will appear as so:
QSY Session
The QSY session link provides the means to edit your operating session and change any parameter except the callsign for the operating session. The operating session management form shown in the Setting Up an Op Session section will open and any necessary changes may be made. Updating your operating session in this fashion will reset the expiration timer and "refresh" the operating session indication.
End Session
Once you have concluded your operating session or you need to change to a different managed callsign, you would use the "End Session" link. You will be prompted to confirm:
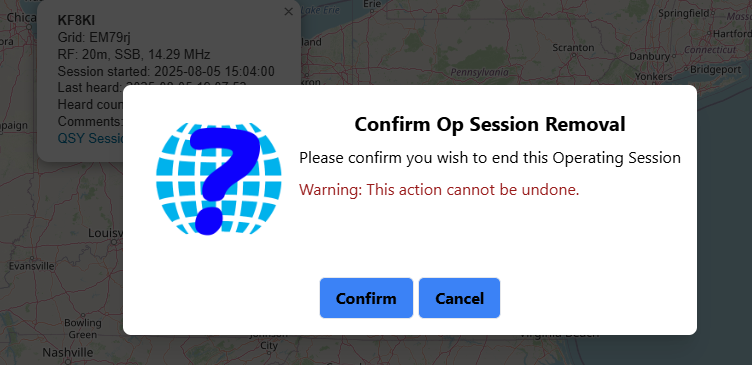
Removing an operating session cannot be undone, so if an operating session is inadvertently removed, a new session must be created.
Interacting with Another Op Session
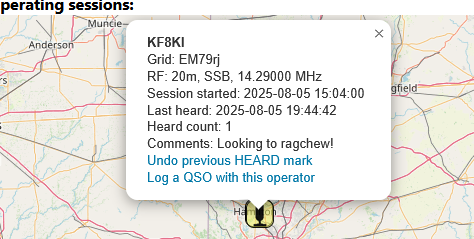
If you aren't running an operating session of your own, then you will likely want to interact with other operating sessions in progress. To do so, simply visit the operating session item in the list view, or click on the associated marker in the map view. As a user, someone else's operating session will appear as so:
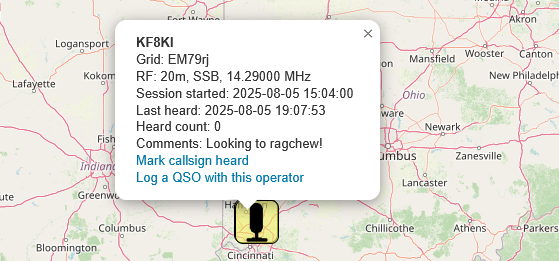
Mark Heard
The ability to mark another operator's operating session heard provides the ability to give a user some feedback that they are getting out, even if a QSO can't be conducted for whatever reason.
Important Note: marking an operating session as "heard" is for direct RF reception of the operator's transmission. It should not be used for reception by SDR via the internet or though other relayed means. The mark is a reflection of real RF propagation and is to be used as such.
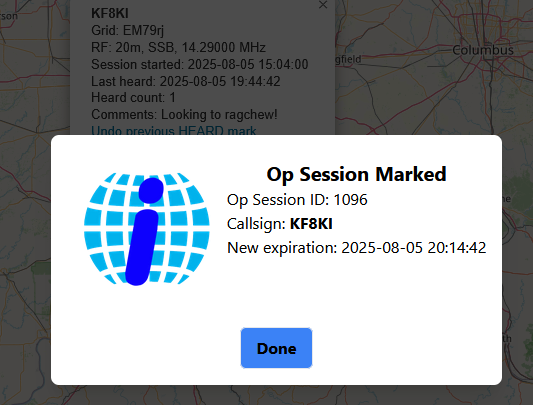
To prevent abuse, a user may mark another operator's session as "heard" once. When you mark a session heard, you will be asked to confirm that this is actually a direct RF reception of the transmission:
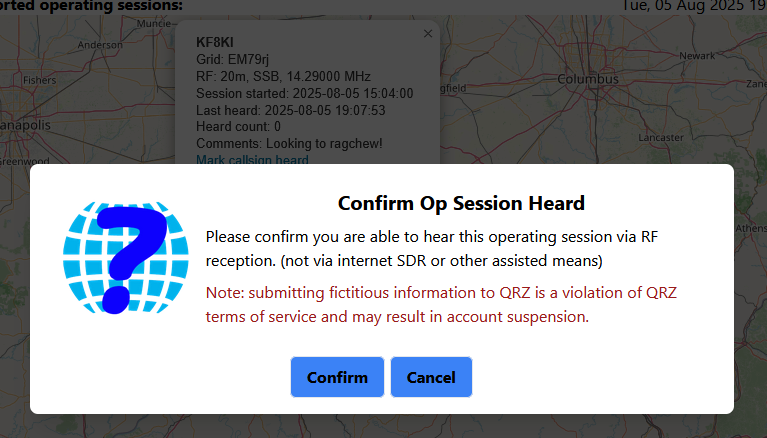
Once a session has been marked "heard" it will reset the expiration timer and "refresh" the operating session indication. The operating session's "heard count" is also updated. A confirmation is provided:
Un-Mark Heard
If a session is inadvertently marked "heard" it is possible to remove that mark. The user's links for that operating session will change to:
Selecting the "Undo previous HEARD mark" option will prompt for confirmation and if confirmed, will remove the operating session mark of heard. Note that if the mark is removed, the user will not be able to mark that operating session heard again.
Log a QSO with this Operator
Once you've actually worked the operator who's operating session you are viewing, you can then select the "Log a QSO with this operator" link to open a new logbook entry for this operator
in your currently open logbook. Be sure to select the correct logbook if you have more than one. Future development will include more advanced logbook integration.
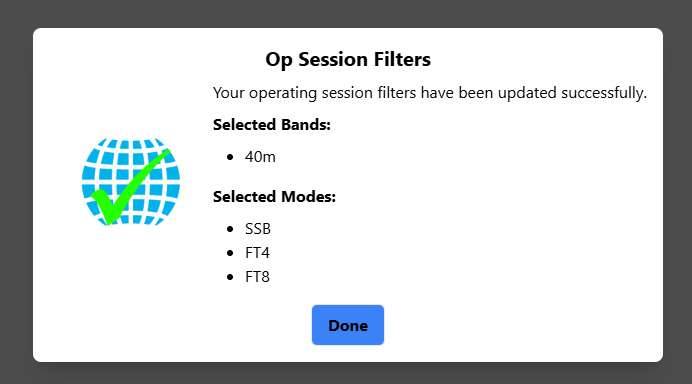
Filtering the Display
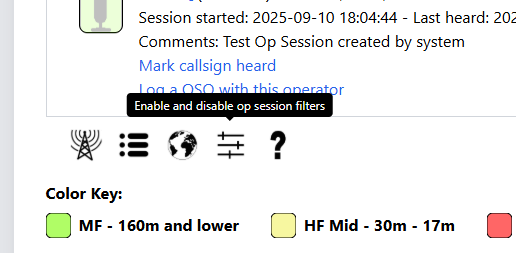
The Real Time QSO Manager provides the ability to select filters so as to reduce the number of operating sessions shown on the map or list views and ease the identification of sessions an operator may wish to work. To enable or disable operating session filters, select the filter control button on the tool bar below the map or op session list:
This will open the filters control panel. Scroll through the available bands and modes and select which bands and modes you wish to display op sessions for. Holding the control key while clicking selections allows a choice to be selected or deselected and for multiple selections to occur. No choices selected clears all filters and returns all bands or all modes as applicable.
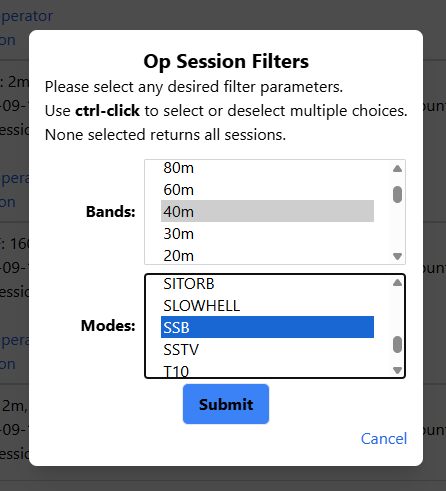
Once the desired filters have been selected, click submit. The filters and the corresponding display will be updated and the choice of filters confirmed.
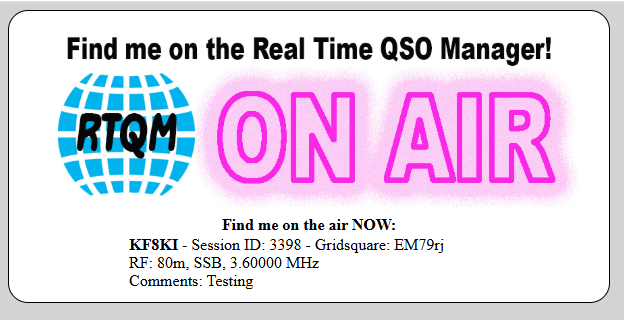
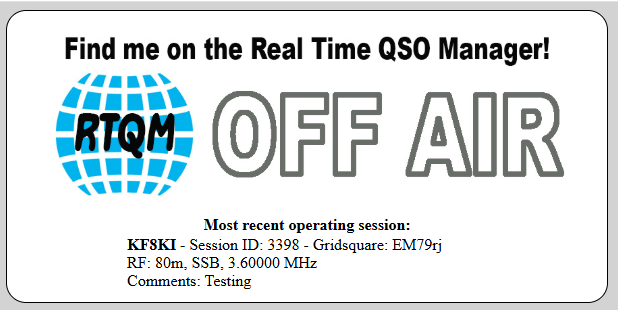
The RTQM Widget
The Real Time QSO Manager provides a widget which may be embedded in your QRZ bio or any other web page in order to advertise your operating sessions to the world. A simple iframe needs to be embedded where you wish the widget to appear. Once included, each time the parent page is loaded, the RTQM database is queried for your latest operating session and the details are shown, including if you are currently on or off the air. Clicking on the graphical part of the widget will open RTQM in a new tab or window. When you have an active operating session, the widget will appear as:
Once your operating session has expired, the widget will show your most recent operating session:
To use the widget, be sure to edit the SOURCE code of the page you wish to include the widget in, and insert the following code at the position the widget should appear:
<iframe height="400px" width="650px" frameBorder="0" src="https://rtqm.beta.qrz.com/widget?callsign=XX1XXX"></iframe>
Be sure to change XX1XXX to your callsign!